Overview
This article explains D2L Brightspace quiz questions. There are several types of questions you can add to quizzes and there are many ways to add the questions to Quizzes. You can organize the questions into Sections. This article will clarify these points.
Import Questions
Intended Audience: Faculty
Question Library
As a best practice, it is recommended that questions be built in the Question Library and then imported into your quiz. You can import your questions in a way that makes sense. This allows an instructor to easily import questions into any Quiz and use them in question pools. It also makes it easier to update questions over time. See Using the Question Library for more information.
- In a course, select the More dropdown.
- Select Quizzes.
- Choose the Question Library tab.
- Select the New dropdown.
- Follow the steps below to add Sections and Questions
Adding Questions to D2L Brightspace Quizzes
1. Navigate to an Edit Quiz page, whether creating a new quiz or editing an existing one.
2. Click Add/Edit Questions
If this is a new quiz, you are now presented with a page with several options: Add and Import. If you are editing a quiz that already has questions it will take you to a page with your sections and questions where you can add or import more questions.
Either way, you can Add or Import questions to your quiz. We're going to cover these options on the remainder of this page. Let's cover them out of order a bit. We'll start with Sections, then Question Pools, and lastly questions.
Sections
Within quizzes, Sections are a way of organizing similar questions. Think of sections as folders. They are student-facing and help enhance their quiz experience since questions are organized. Some sections you might create are question type: true/false, multiple-choice, short answer, etc. Other sections you may create are chapters, units, or weeks. Say your quiz or exam covers Chapters 1, 2, and 3. Create a section for each chapter. One titled "Chapter 1". One titled "Chapter 2." and one titled "Chapter 3."
You can take this one step further by creating sub-sections (or folders within folders, if you like). You could create an organization like.
Chapter 1/Multiple Choice
Chapter 1/True or False
Chapter 2/Multiple Choice
Chapter 2/True or False
and so on...
To create Sections
1. Click Add/Section
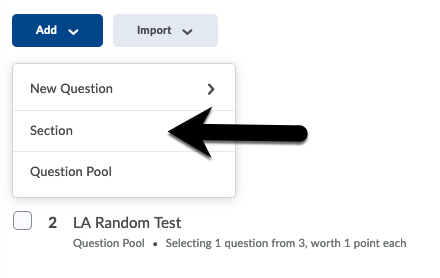
2. A page will load with Information about the section you are creating. You can add information and change some settings. You can find more information below.
Section Title: The Section Title is typically descriptive of the type of questions in the section. You can choose whether students see the section title. This is a personal preference.
Section Text: This is optional. It is a blurb of text that describes what kind of questions are in the section. You might say something like, "This section contains all of the questions from Chapter one" or "These are all of the Multiple Choice questions. They are worth 1 point each."
You can hide the section from the learners. If you do then these questions will be unorganized. If you hide all of the sections then the questions in the quiz will flow without any breaks.
Lastly, you can shuffle the questions in the section. This helps minimize cheating as the students won't have identical quizzes.
See a preview of the section title and Section Text on the right.

3. When you are ready click Save or Save and New or Save and Copy.
- Save saves the section and takes you back to the Add/Edit Questions page
- Save and New creates your section and opens a page to create another with blank settings.
- Save and Copy creates your section and opens a page to create another but fills out all of the info copied from the section you just created.
Question Pools
You can have your quiz pull a subset of questions out of a total pool. This greatly minimizes cheating.
To learn more about Question Pools and how to create them follow this link.
New Question
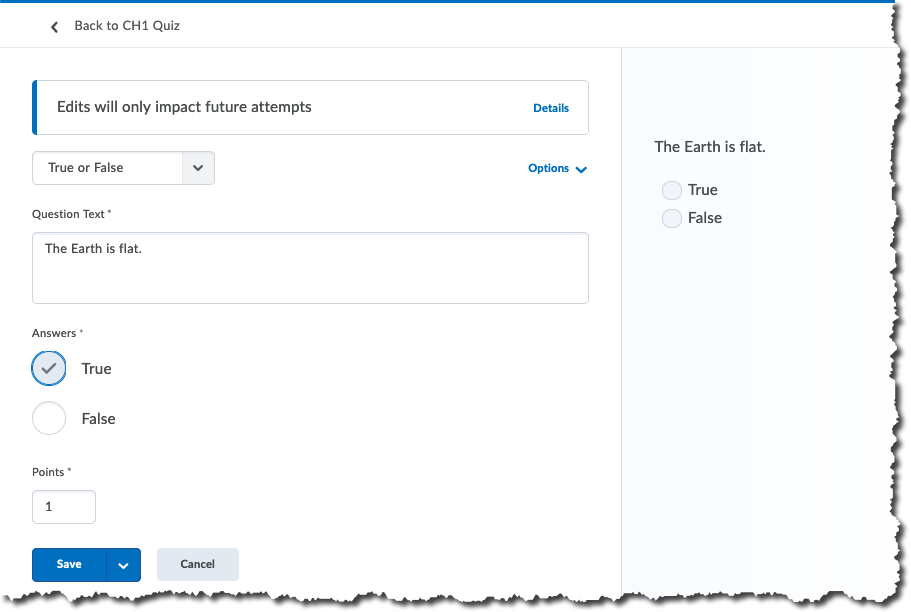
True or False Question
True and False Questions allow for only. These types of questions allow users to simply choose a correct answer between True or False.
Example

Setup
- Enter the Question Text.
- Choose the correct answer as "True" or "False."
- Add answer feedback if you like. You can give specific feedback based on how they answer. This is a chance to instruct the student. For instance, if they answer correctly you may say "That's Correct! The early is flat" or "False. Read more about it on page 39."
- You can set Overall Feedback that the students will see no matter how they answer. You might say, "Read more about the signers of the Declaration on page 58 of your textbook.
- Enter the number of points the question should be worth.
- Optional: Select the Options dropdown in the top right to include additional settings.
- Hint: You can turn on a hint if you would like. Hints must be turned on in the quiz settings.
- Enumeration: By default, quiz answers are not enumerated. You can change the enumeration that appears before the answers: Capitals (A), lowercase (a), Numbers (1), lowercase roman numeral (i), capital roman numeral (I).
- Short Description: If you want you can write a description of the question. This is useful if you want to add more content.
- Select Save.
- After all the questions have been created, select Done Editing Questions.
Multiple Choice Question
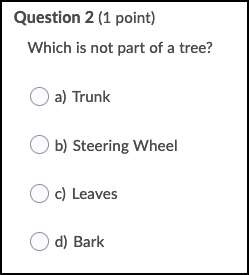
These questions are the most popular question type in D2L Brightspace. Each question can have between 2-20 answer choices. Only one answer indicated as correct. These questions are auto-graded by D2L Brightspace.
Example
Setup
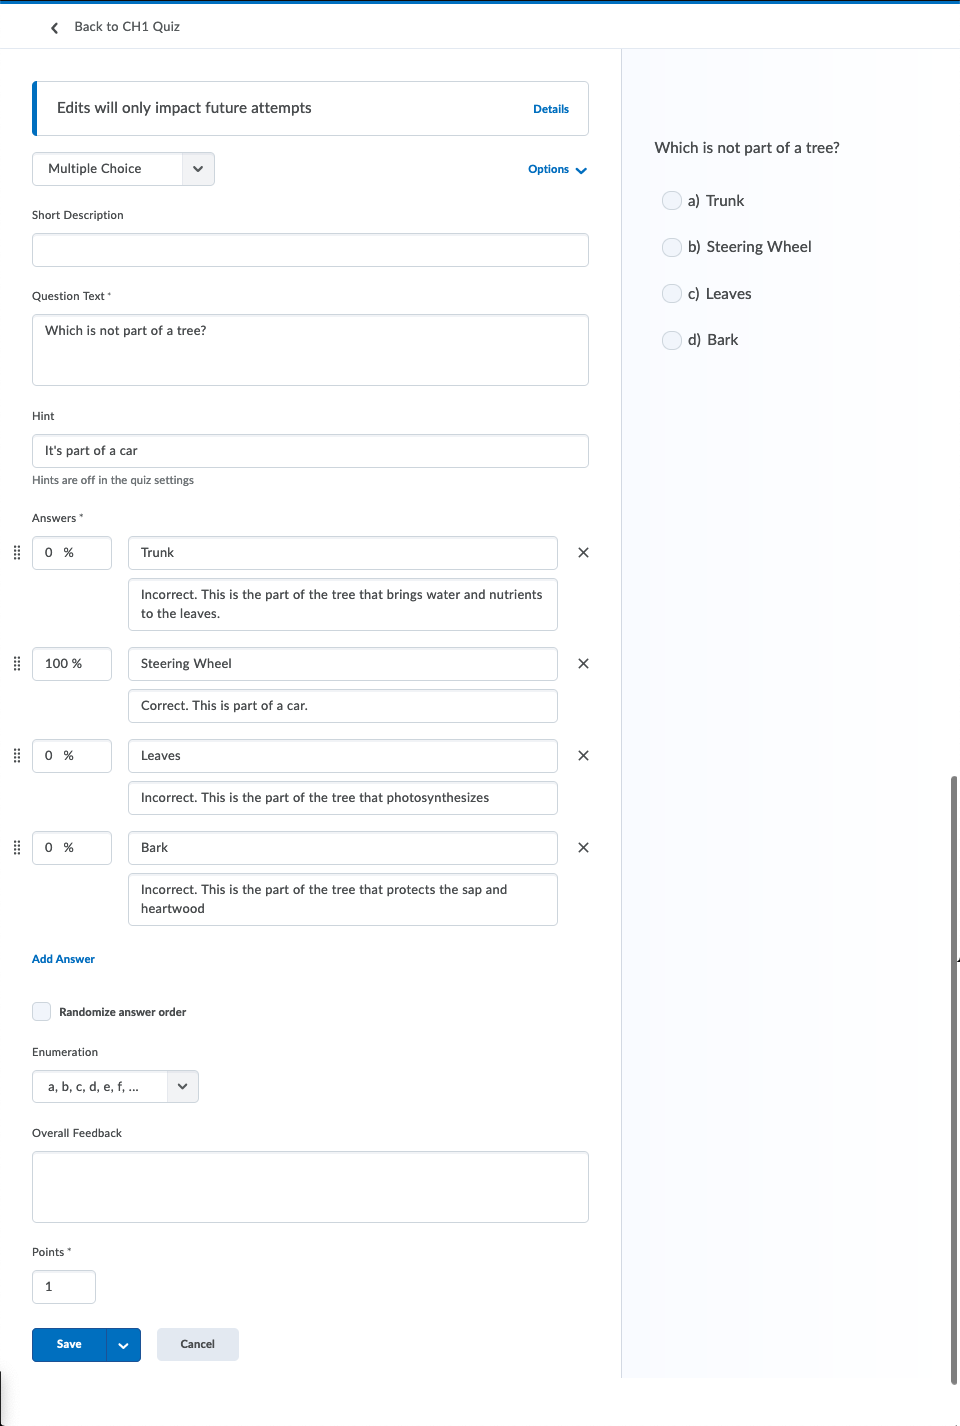
- Enter the Question Text.
- Enter the answer choices in the text boxes.
- Choose the correct answer.
- Optional: You can click Add Answer if you would like to add more answer choices.
- Optional: Randomize the order of answers that appear to students by checking the "Randomize answer order" box. Don't do this for questions that include "All of the Above" or "None of the Above" as an answer choice.
- Choose how many points the question is worth. By default it is worth 1.
- Optional: Select the Options dropdown on the top right to include additional settings.
- Feedback: This allows for questions to be pre-populated with generic feedback. There are two kinds of feedback Question level and answer level. To add feedback, select Add Feedback.
- Overall (Question) level - This is generic feedback that is relevant to the question.
- Answer level - This is more specific to each answer. For instance, you can say whether they got the question right or wrong and reinforce why it was right or wrong. Likewise you can point your students to where to find the answer.
- Hint: You can put whatever you like in the hint. Use this to clarify any confusing points or direct the students where to find the correct answer. Hints must be turned on in the quiz settings.
- Short Description: You can give greater context to your question.
- Custom Weight: This allows questions to be worth partial credit. This is accomplished, by setting one answer to 100% and another or 50%, it allows users to get full credit or partial credit based on the answer chosen. To add custom weights, select Add Custom Weights.
- Enumeration: These are the same as True or False (see above).
- Select Save.
- After all the questions have been created, select Done Editing Questions.
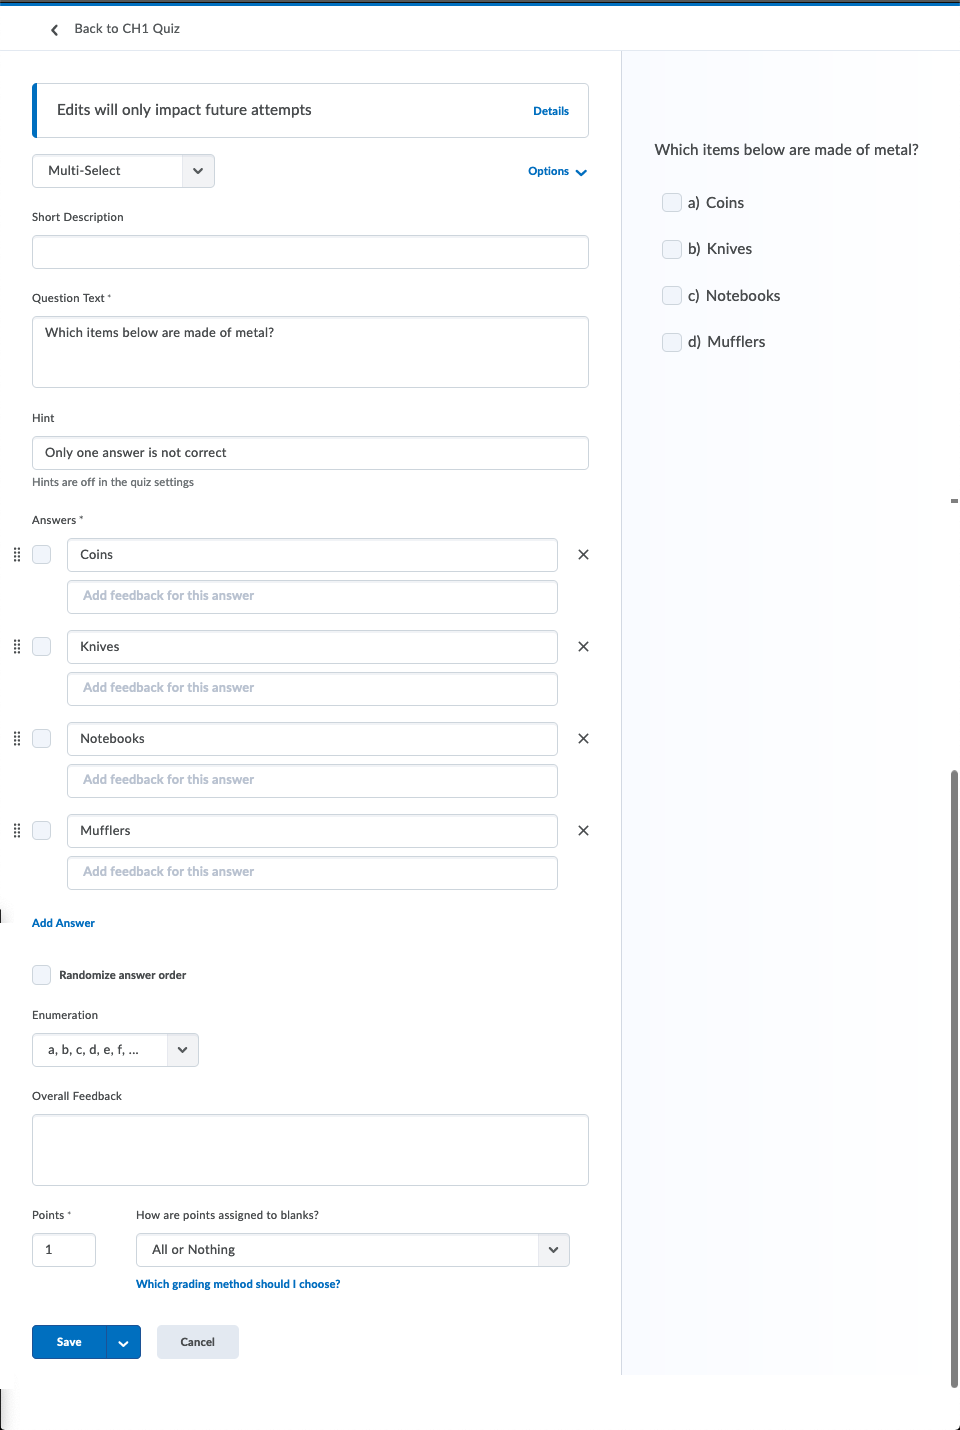
Create a Multi-Select Question
These questions are very similar to the Multiple Choice Question, but this type allows for the question to have more than one correct answer. D2L Brightspace can auto-grade these questions, based on the scoring setting chosen under "How are points assigned to blanks?"
Example
Setup
- Enter the Question Text.
- Enter the answer choices in the "Value" text boxes.
- Choose the correct answer(s).
- (Optional) Randomize the order of answers that appear to users by checking the "Randomize options" box.
- Optional: Select the Options dropdown on the top right to include additional settings.
- Feedback: This is the same as Multiple Choice (see above)
- Hint: This is the same as Multiple Choice (see above)
- Short Description: This is the same as Multiple Choice (see above)
- Enumeration: These are the same as True or False and Multiple Choice (see above).
- Use the menu for "How are points assigned to blanks?" to choose how the question will be calculated:
- All or Nothing: This means that users only receive full points if they select all of the correct answers and none of the incorrect answers. If they miss any correct answers or select any incorrect answers, they receive zero points.
- Correct Answers, Limited Selections: Points are evenly distributed across correct answers only. The number of selections allowed is limited to the number of correct answers. Learners earn partial points for each correct answer selected.
- Right Minus Wrong Selections: This means that users receive points equal to the number of right answers they choose minus the number of incorrect answers they choose. For example, if a question is worth 2 points and has 4 answer choices, each correct answer is worth 0.5 points and each incorrect answer is worth -0.5 points. Users cannot receive a negative score.
- Correct Selections: This means that users receive points for the number of correct answers they choose and incorrect answers they don't choose. For example, if a question is worth 2 points and has 4 answer choices, each correct choice is worth 0.5 points.

Note: For more information on the grading options for multi-select questions, please review this guide from Brightspace.
- Select Save.
- After all the questions have been created, select the Done Editing Questions button.
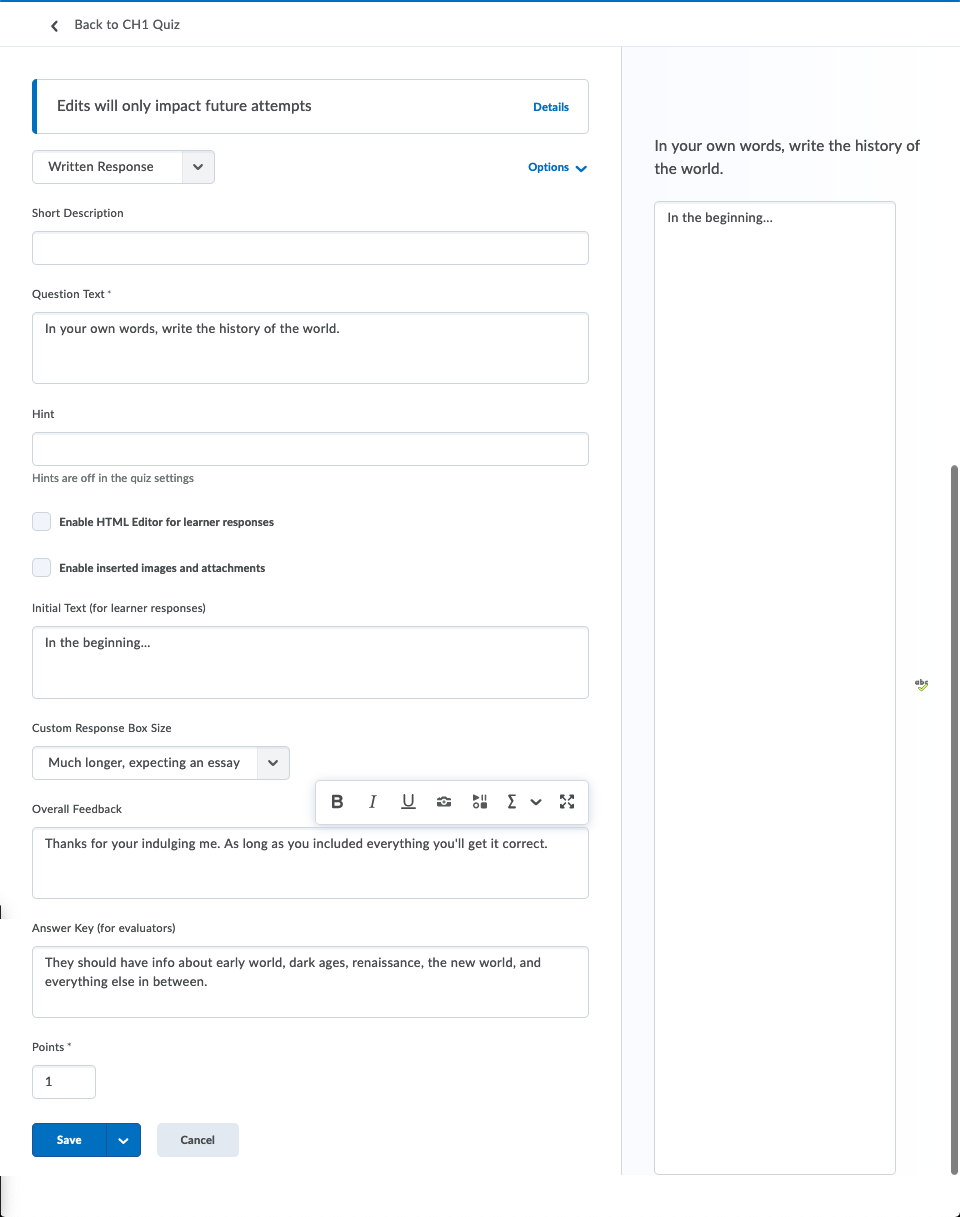
Create a Written Response Question
These are questions where students should be typing in answers to a question prompt. D2L cannot auto-grade these questions.
These are questions where there is one answer is ideally only one or two words. Unlike Written Response questions, these can be auto-graded by D2L. For auto-grading to work, all possible correct answers must be indicated. If a student does not type an answer exactly as indicated, it will be marked wrong. It is recommended to always double-check student responses to these questions.
File Upload: Written response questions can also be used for responses requiring a file upload.
Example

Setup
- Enter the Question Text.
- Optional: Select the check box "Enable HTML Editor for student responses" box to allow users to format responses (such as bold, italic, bullet lists, etc.) and embed media.
- Optional: For responses requiring a file upload, select the check box to "Enable inserted images and attachments."
- Enter the number of points the question should be worth.
- (Optional) Select the Options dropdown to include additional settings. You can remove the settings in the dropdown too.
- Feedback: This is the same as Multiple Choice and T/F (see above). To add feedback, select Add Feedback.
- Add Hint: You can add a hint that the students will see. This can also be information that points the students in the right direction.
- Add Short Description: This can be informations that can further illuminate
- Answer Key: This is text that only appears to evaluators after the user has submitted a quiz attempt. This can be used to help evaluators know what to look for in a written response.
- Add Custom Response Box Size - You can choose the size of the answer box. By default it is "about a paragraph." You can choose shorter (about a sentence) or longer (an essay).
- Initial Text: You can type text that will appear in the answer box. it can be the first few words or sentences to help the students get started in the right direction.
- Select Save.
- After all the questions have been created, select Done Editing Questions.
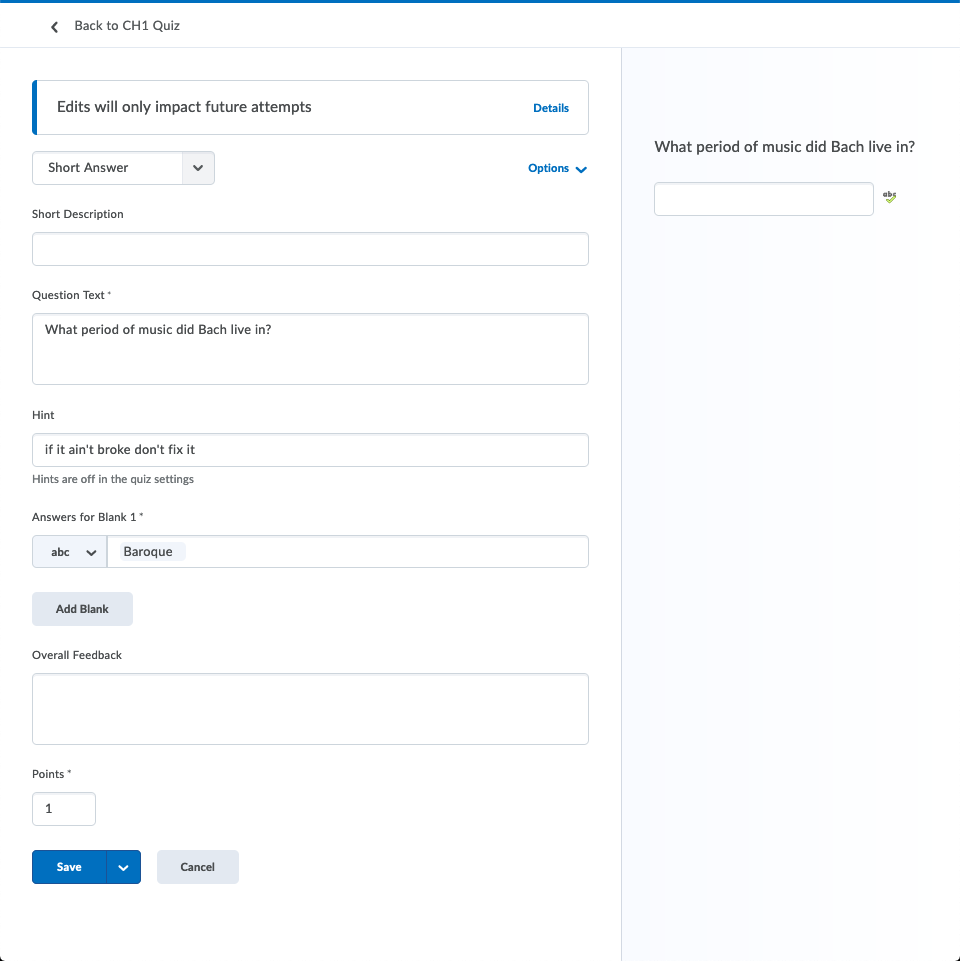
Short Answer
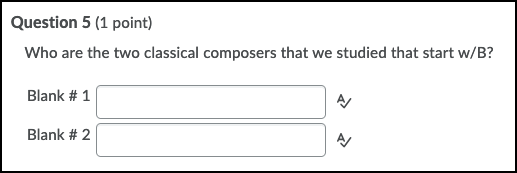
These questions the student is presented with a question with a blank line. Typically these questions are for short words or phrases.
While D2L can auto-grade this question type, it is recommended to always double-check students' responses to these questions.
Example
Setup
- Enter the Question Text.
- Enter the correct answer for Blank 1. You can add multiple correct answers to include variations or common misspellings
- You can add more than one blank if the question requires several answers.
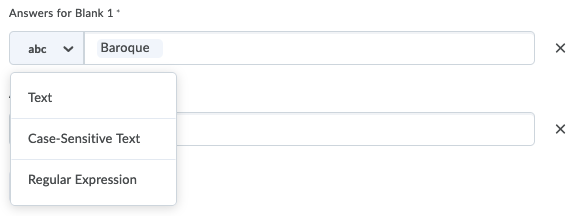
- You can choose between several types of accepted answers.
- abc - This simply a text box that accepts any plain text
- Case-Sensitive Text - The student must capitalize exactly the same as the correct answer you supply
- Regular Expression - This can get complicated, but you can write rules that allow for variations. See this page on D2L's documentation for more about expressions.
- Enter the number of points the question should be worth. If you choose more than one blank, you can assign points to the blanks in several different ways.
- Learners receive part marks (x.x pts per blank) - The points are divided among all of the blanks
- Learners must answer all blanks correctly - This will assign 0 pts unless the students answer all blanks correctly.
- Optional: Select the Options dropdown to include additional settings. You can remove the settings in the dropdown too.
- Add Feedback: This is the same as Multiple Choice and T/F (see above).
- Add Hint: You can add a hint that the students will see. This can also be information that points the students in the right direction.
- Add Short Description: This can be informations that can further illuminate
- Select Save.
- After all the questions have been created, select Done Editing Questions.
Multi-Short Answer
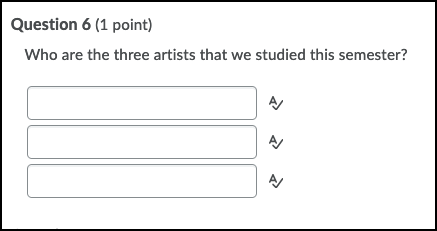
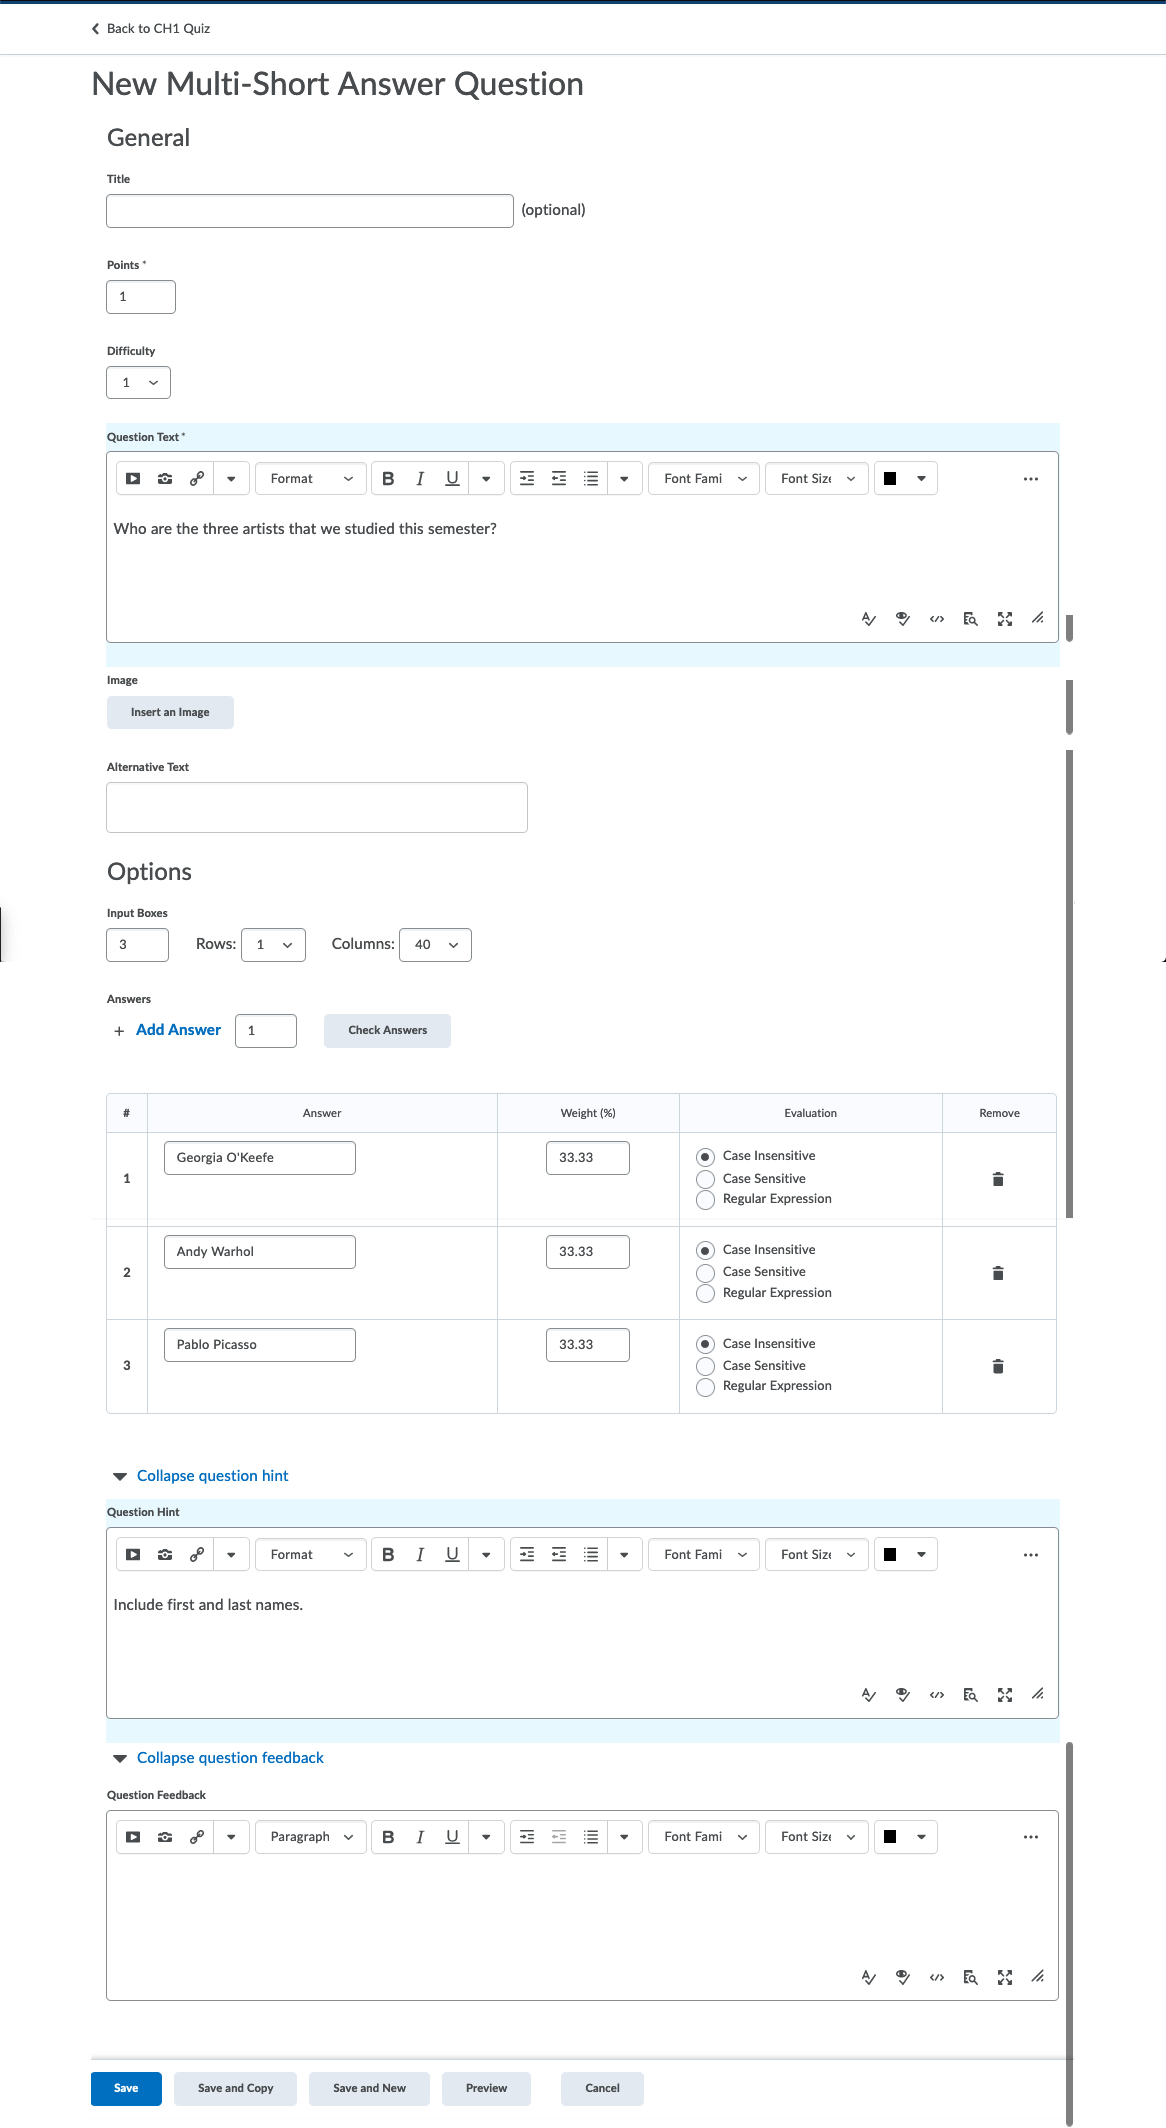
This question type has been deprecated by the Short Answer type. You are not able to add multiple blanks to the regulare Short Answer type which now makes this question type obsolete. This question type works the same as the standard Short Answer but allows the student to enter multiple different answers. This is an older style question and the "edit" page not been updated by D2L.
These questions can be auto-graded by D2L. But for auto-grading to work, all possible correct answers must be indicated. If a student does not type an answer exactly as indicated, it will be marked wrong. It is recommended to always double-check student responses to these questions.
Example
Setup
Fill in the Blanks
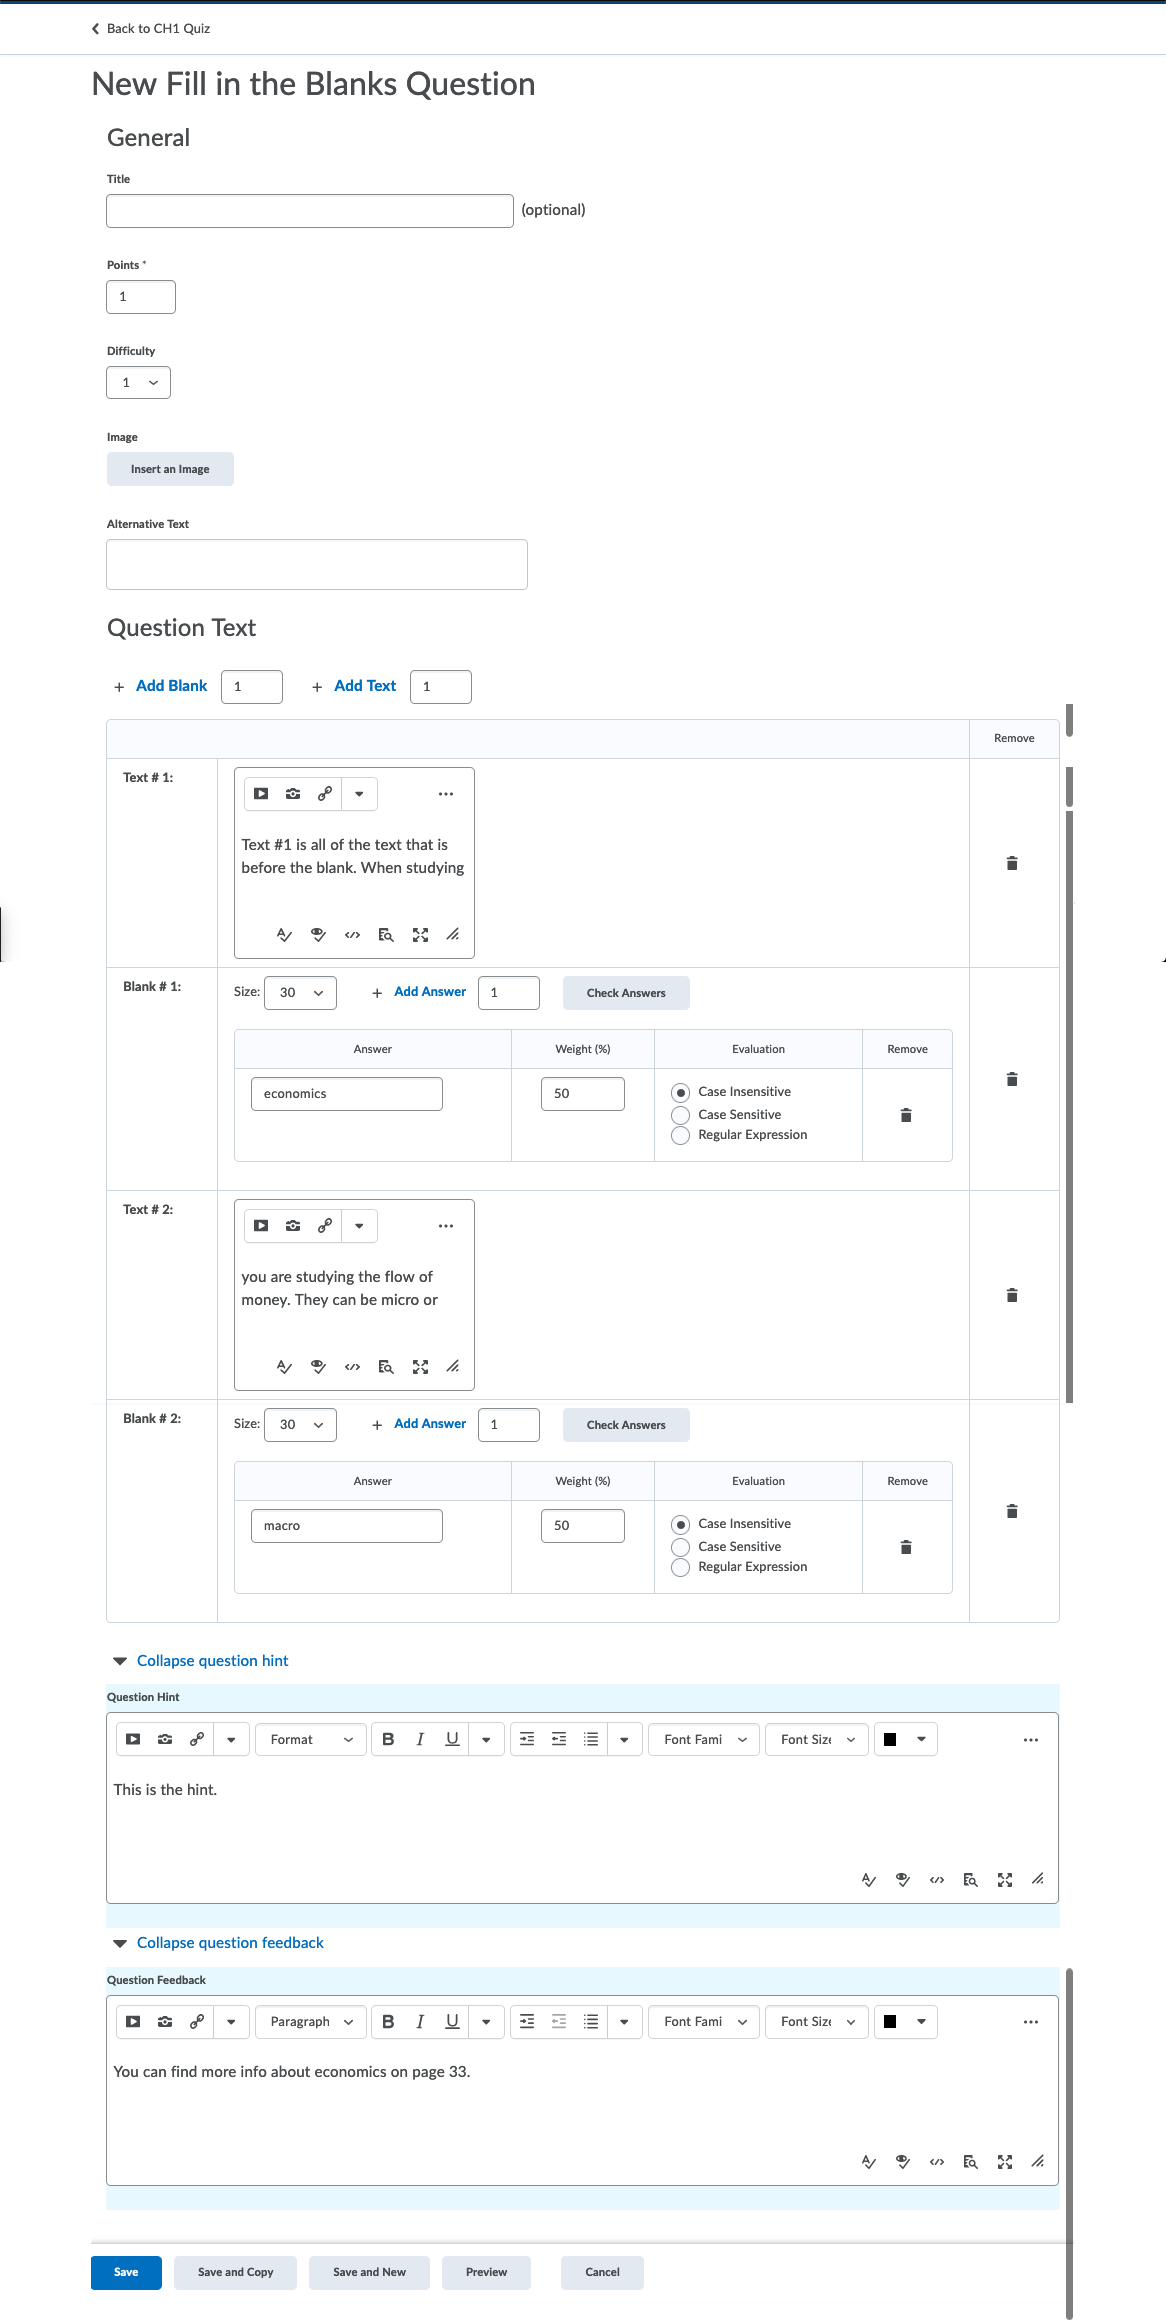
These questions are similar to short answer questions, but instead of having the answers at the end of the question, there are blanks in the middle of a paragraph for the students to enter text. This is an older style question and the "edit" page not been updated by D2L.
Similar to the text-entry style questions above, while D2L can auto-grade this question type, it is recommended to always double-check students' responses to these questions.
Example

Setup
- Optional: Add a Title. This title will display in the question list while editing the quiz. It makes it much easier to find your questions. Be default the title will be the first so many characters of your question.
- Enter Points the question is worth
- Optional: Insert an image if you want. (Alternative text is available for accessibility if you add an image)
- Constructing the parapgraph can be a bit tricky. Everything in Text # 1 will appear before Blank # 1
- Enter the correct answer for Blank # 1.
- You can add multiple correct answers to include variations or common misspellings by clicking Add Answer (or more by typing the number in the box).
- Chose the weight for the blank. The total weights across blanks must total 100%. if you have one blank, make it worth 100%. if you have more than one you can divide the weight evenly across them or you can make some blanks worth more points. As long as they equal 100%.
- Chose whether the answer is Case Insensitive, Case Sensitive, or a Regular Expression.
- Text # 2 will be everything after Blank # 1, so it will finish the sentence.
- Optional: Select the Options dropdown to include additional settings. You can remove the settings in the dropdown too.
- Add Hint: You can add a hint that the students will see. This can also be information that points the students in the right direction.
- Add Feedback: This is the same as Multiple Choice and T/F (see above).
- Select Save.
- After all the questions have been created, select Done Editing Questions.
Matching
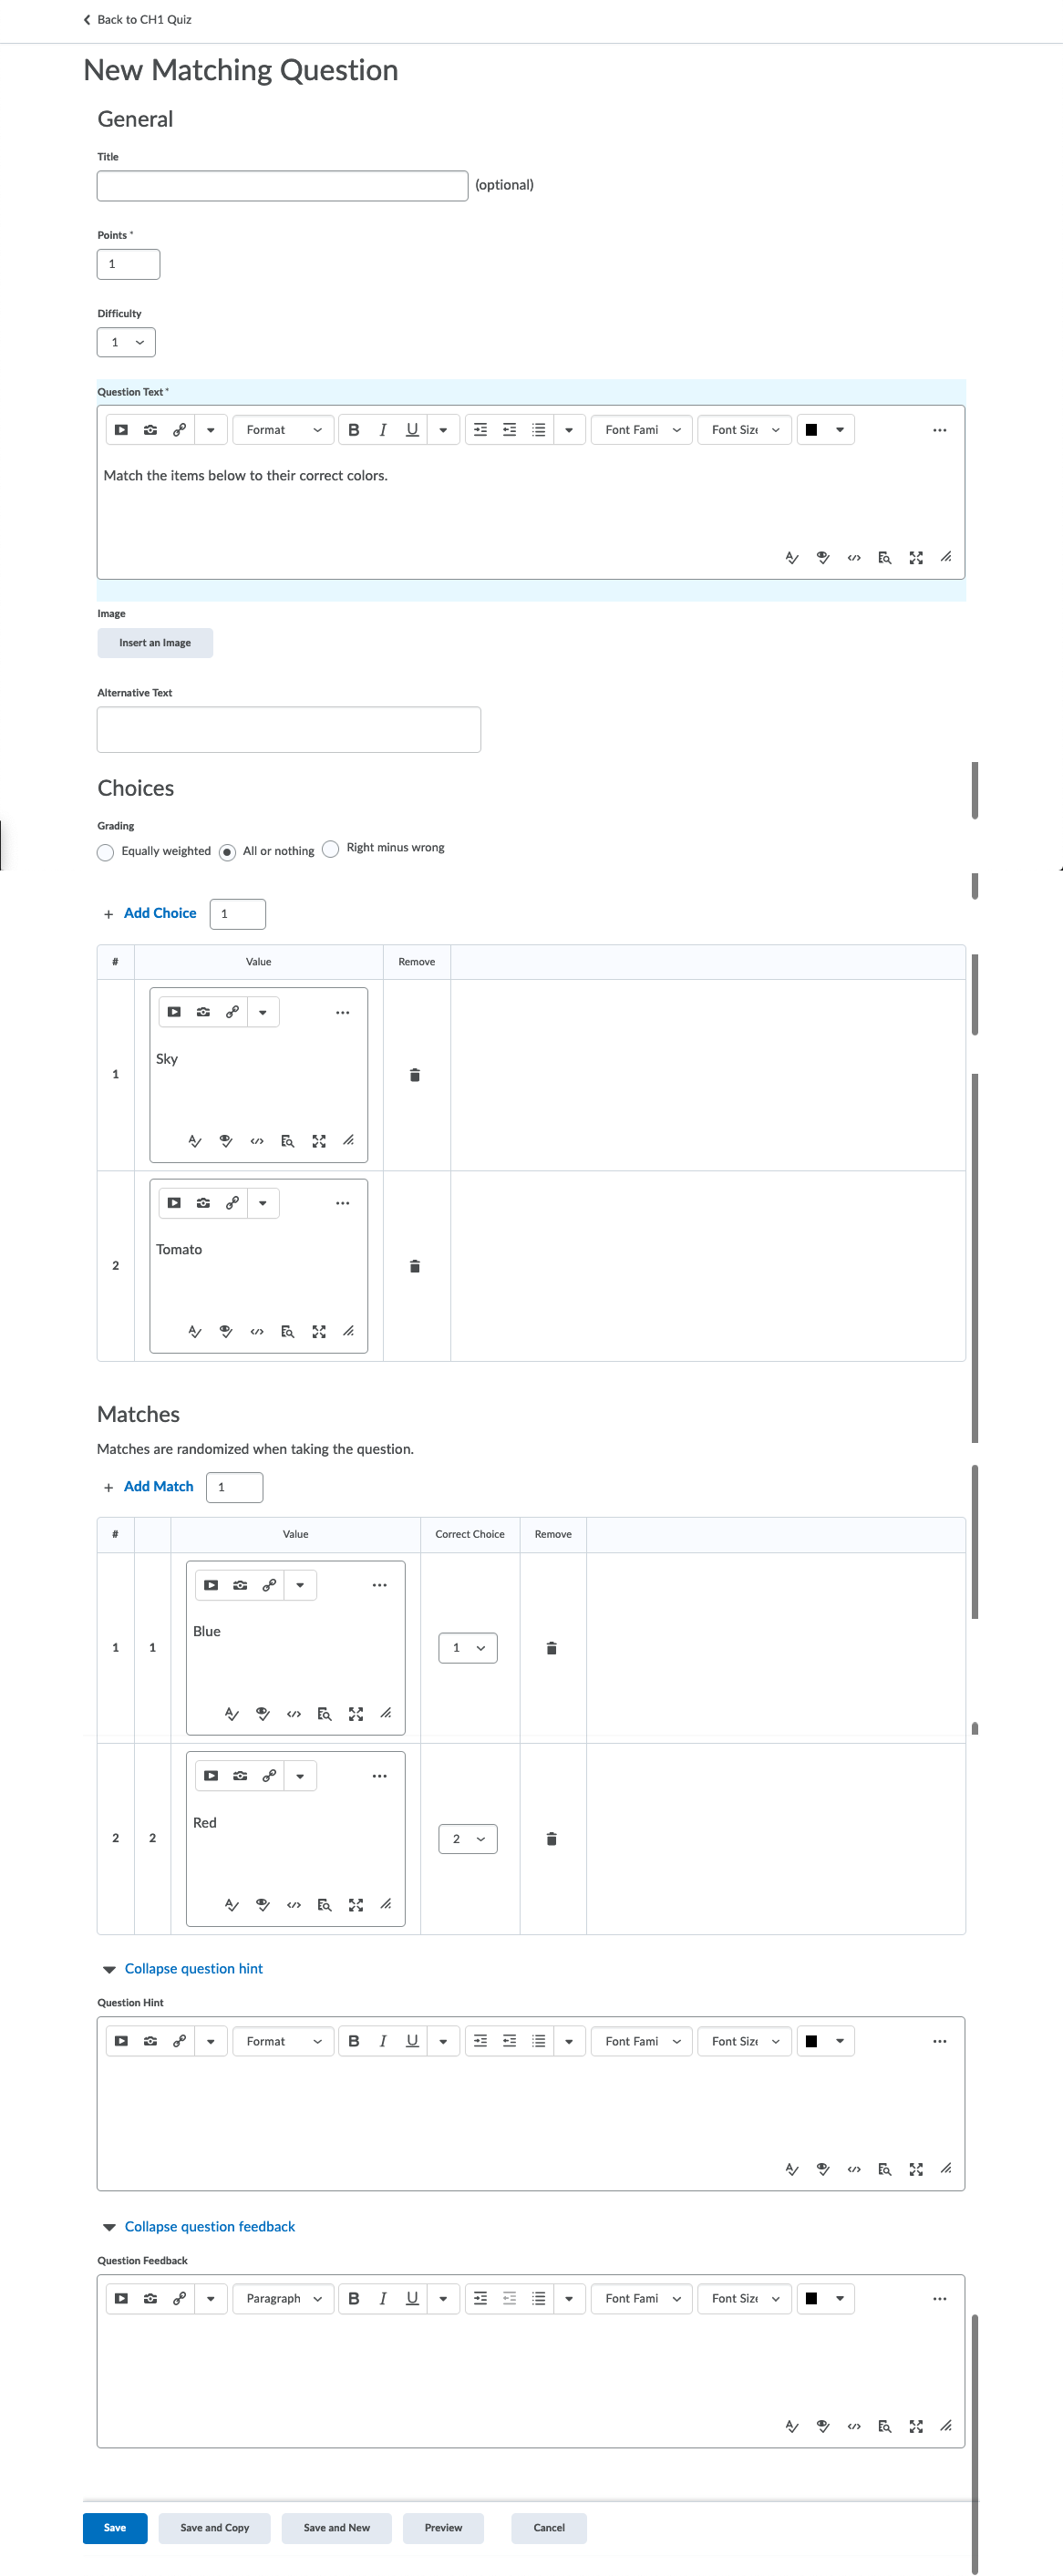
These questions allow there to be two columns of text, having one item from each column match an item in the other. These are perfect for some types of content such as matching a composer to a piece of music or a word in another language. They can be kind of tricky. This "edit" page for this quiz has not been updated.
Example
Setup
1. Add an optional title.
2. Enter the number of points for the question.
3. You can change the difficulty of the question. This doesn't actually change the difficulty but allows you to sort the questions by difficulty. Also, it signals to the students how difficult each question is.
4. Choose the type of grading for the question.
- Equally weighted - This will divide the total points between the total number of choices
- All or nothing - This is the default. If the students don't answer all of the options correctly they will not be awarded any points.
- Right minus wrong - If there are six choices and the student answers two incorrectly they will get four points.
5. This is where you create the maand their corresponding correct choices. Make sure that the correct choice is in the same number box that matches the corresponding Matches box #. Think about how these questions are presented to the students. See the example above. There are two columns. On the left is your Choices column and on the right is the Matches column.
Say you want to match some items with their colors. In Choices, box #1 put the color Blue. In Matches box #1 put "Sky." In Choices, box #2 put the color "Red" and in the Matches box #2 put "tomato."
You can add more choices and matches. Put the number of choices or match options you want to add to the question and click "Add Choice" or "Add Match" respectively.
6. (Optionally) You can add a Question Hint
7. (Optionally) You can add overall Question Feedback. This is a great opportunity for you to continue to instruct your students. You can further illustrate the point of the question or reiterate the point or offer another perspective.
8. Click save
Ordering
These are questions where the student must put a series of items in the correct order. The answers will be randomized when the student is taking the quiz. The answers must be set up in the correct order.
Example

Setup
- Optional: Add a Title. This title will display in the question list while editing the quiz. It makes it much easier to find your questions. Be default the title will be the first so many characters of your question.
- Enter Points the question is worth
- Enter the Difficulty. This is especially helpful when working with the quesiton library. You can sort your questions by difficulty.
- Enter the question text.
- Optional: Insert an image if you want. (Alternative text is available for accessibility if you add an image)
- Choose how the question is graded.
- Equally weighted - The total points are divided by the number of steps.
- All or nothing - Just as it says, the student must answer the entire order correctly or they don't get any questions.
- Right minus wrong - The student starts with the total available points and then each wrong answer is subtracted.
- Start constructing the order. In row 1 enter the first step, in row 2 enter the second value, and so forth. All of the items are randomized when the student takes the quiz. You can add Feedback for each step.
- Click Save
- After all the questions have been created, select Done Editing Questions.
Arithmetic
These are complex question types. They allow faculty to test their students' knowledge and understanding of mathematics. Each student will receive a unique question because each will receive a set of variables that randomly generates numbers within the problem.
Maybe someone in the Math Department can teach us how to use this question type.
Rounding: Currently Brightspace rounds up from .5. You can change "Round to Half Even" rule that rounds.5 answers down.
Setup
All variables must be enclosed in curly braces.
i.e. 2 * {x} + {y} - {z}
Here are some of the supported functions:
+,-,*,/ - basic mathematical operators
{x}^{y} - x to the power y
abs({n}) - absolute value of n
cos({n}) - the cosine of n (in radians)
sin({n}) - the sine of n (in radians)
sqr({n}) - the square root of n
tan({n}) - the tangent of n (in radians)
log({n}) - the log base 10 of n
ln({n}) - the log base e of n
The following constants are supported:
pi - 3.14159265358979
e - 2.71828182845905

Significant Figures
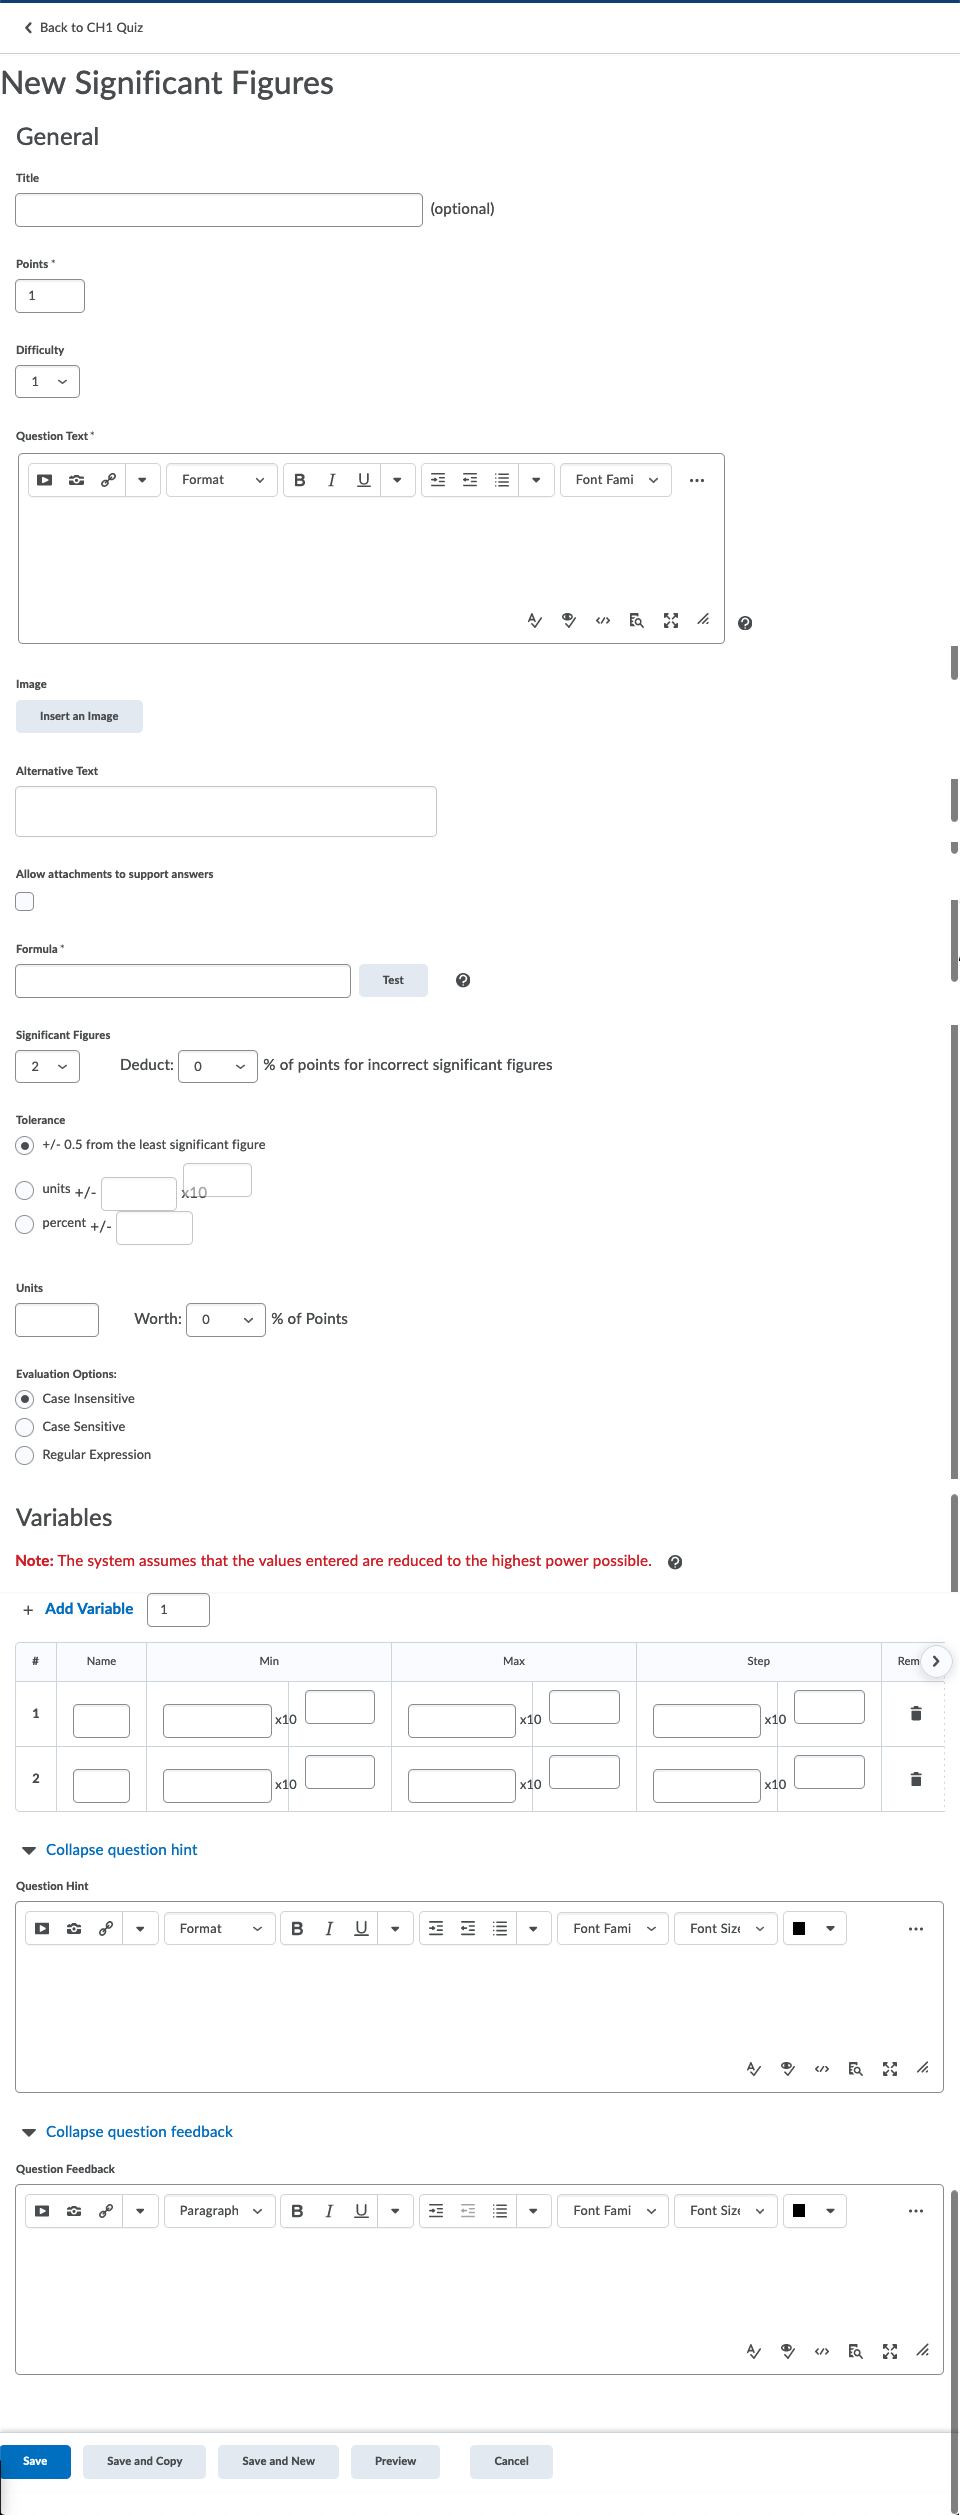
These are complex question types that are typically used for math courses. Significant Figures questions require students to answer using scientific notation and provide solutions that contain a correct number of significant figures. You can include variables that randomly generate scientific notations in order to ensure that students get different questions.
Setup
All variables must be enclosed in curly braces.
i.e. 2 * {x} + {y} - {z}
Here are some of the supported functions:
+,-,*,/ - basic mathematical operators
{x}^{y} - x to the power y
abs({n}) - absolute value of n
cos({n}) - the cosine of n (in radians)
sin({n}) - the sine of n (in radians)
sqr({n}) - the square root of n
tan({n}) - the tangent of n (in radians)
log({n}) - the log base 10 of n
ln({n}) - the log base e of n
The following constants are supported:
pi - 3.14159265358979
e - 2.71828182845905
Likert
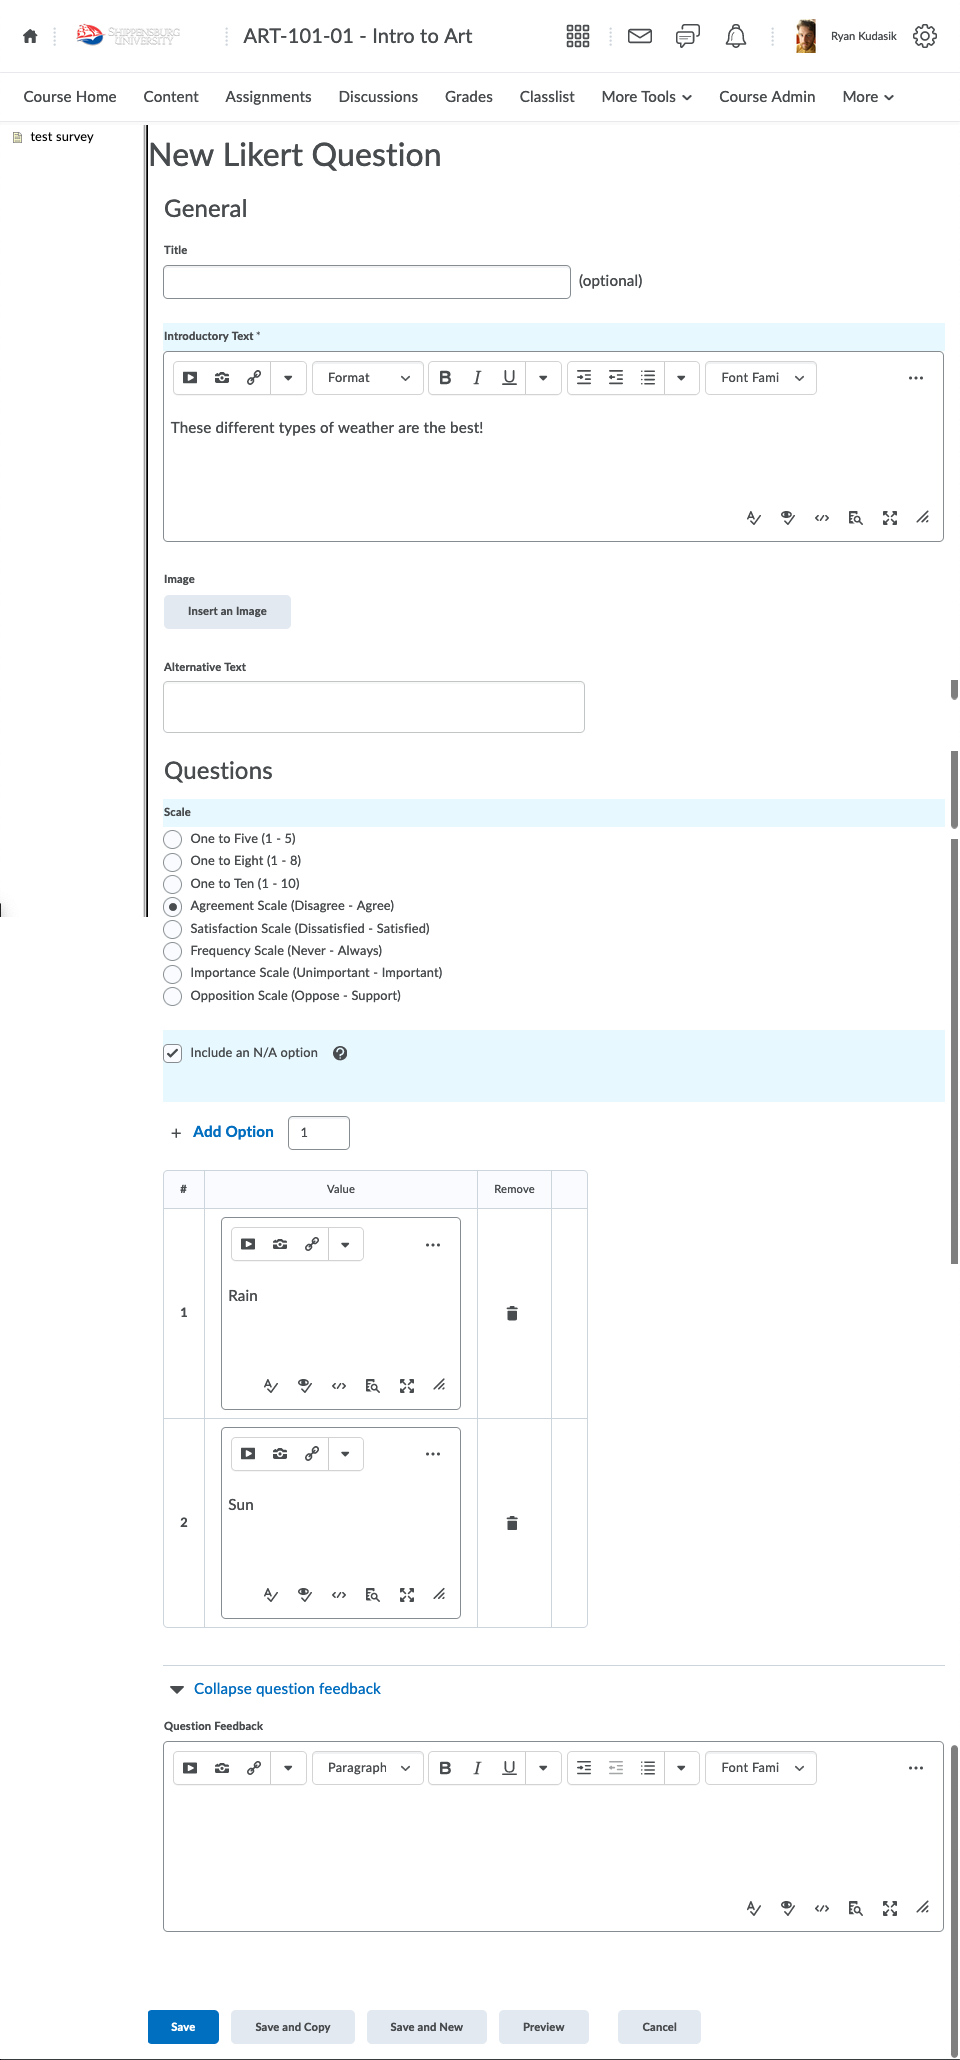
This question type lets users indicate responses to a prompt using a pre-determined scale. Please note that these questions can only be used in Surveys, as there is no way to indicate a "correct" answer; however, you can run reports based on survey answers.
Example

Setup
- Optional: Add a Title. This title will display in the question list while editing the quiz. It makes it much easier to find your questions. Be default the title will be the first so many characters of your quesiton.
- Enter the Introductory Text. This text sets up your question. It will vary greatly depending on what kind of information you are looking for for instance, it may say, "Rate these super heros from 1 to 10" or "Do you agree with these arguments," etc, etc.
- Optional: Insert an image if you want. (Alternative text is available for accessibility if you add an image)
- Choose the scale
- Choose to include an N/A option
- Now you choose the options. Each option value will be a different row that the student will rate based on the scale you chose (the above example has two options (Rain and Sun). You can choose to add and delete your options. In addition, the options can be formatted.
- Add Feedback: This is the same as Multiple Choice and T/F (see above).
- Select Save.
- After all the questions have been created, select Done Editing Questions.
Import
Maybe you already created questions somewhere else. There are ways to import them into your Quiz. This depends on where and how the quizzes are created. You can import premade publisher files, D2L provided CSV files, Respondus, and Question Libraries.
Upload a File/Import Questions from a Publisher File
For quiz questions, some instructors may want to use "test banks" provided by textbook publishers or existing Word documents. If properly formatted, files containing test and quiz questions can be imported directly into Desire2Learn, bypassing the need to copy and paste questions individually. However, other files must first be converted into a document format that D2L will recognize.
- In a course, select the More dropdown.
- Select Quizzes.
- Choose the Question Library tab.
- Select the Import dropdown button.
- Choose Upload a File.
- Select Browse Files to locate the publisher file or drag and drop the file into the popup window.
- Select Review to see the questions that will be imported or select Import All.
- After all the questions have been added or created, select the Done Editing Questions button.
Browse Question Library
One of the benefits of the Question Library is that you can import questions into your quizzes. This alleviates the need to recreate the same question if you use it in chapter tests and Finals.
1. Navigate to the Add/Edit Questions page in the Quiz you would like to import questions to (see above to learn how to do this).
2. Click the Import/Browse Question Library button.
3. You will see a flyout. From here you can filter and sort your questions. Choose the quiz you want to copy from in Source in the top right.
4. Navigate through your sections to find the questions you would like to import. Put check boxes next to the questions
Respondus
Respondus is a program that can convert files for use in D2L. Before converting questions from a test bank file with Respondus, place them in a document with the correct formatting. The document must be saved as a .rtf or .txt file type.
Respondus has excellent resources on their website:
Respondus Quick Start Guide
Respondus: Formatting Questions
Respondus Demo: Publishing a Quiz in D2L
Respondus Test Bank Network
CSV File
You can create a quiz in a CSV file and then import the questions into Brightspace. We recommend that you import the questions into the Question Library and not directly into the quiz. If they are in the Question Library you can import them into your Quizzes (see above).
- Download the attached file. (Note: This file can be downloaded from D2L through the process outlined below. It is the sample file D2L provides when you choose to import using a CSV file.)
- Using the sample file, begin building your questions within the format designated.
- Note: Cells that contain // refer to noted information that should not be included on the file that you submitted. You will want to remove this information from the submitted file.
- Note: Review the notes for each field in Column B. You'll want to remove the descriptor text in each of these fields and enter the value you want. For example, The "Title" field in Column A has a descriptor in Column B with the words "This is a long answer question". You'll want to remove this text and insert a new title if you want. However, you'll want to keep the value in Column B that is next to "NewQuestion" as this will designate the question type.
- Once complete, save the file as a CSV file.
- Click Course Admin
- Click Quizzes
- Create a New Quiz or edit an existing quiz
- Click Add/Edit Questions
- Click Import
- Select the Import Source "Upload a File"
- Drag and drop the file or click Browse Files and locate the file.
- Click Open
- Click Save
- Questions should now appear in the question area.
Add an Image to a Question
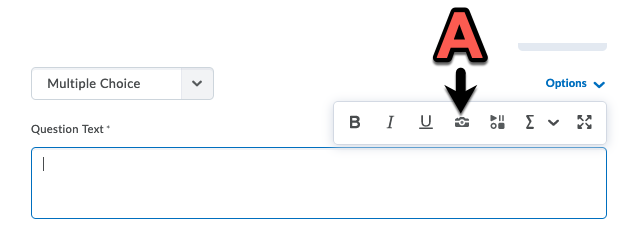
- In the "Question Text" box, select the camera icon (A) to insert an image.
- Select My Computer.
- Select Upload to choose the image file.
- Select Add.
- In the pop-up window, enter text to describe the image in the "Alternative Text" box or select the "This image is decorative" checkbox.
- Select OK.
- Complete the question setup based on the question type chosen.
- Select Save.
- After all the questions have been added or created, select the Done Editing Questions button.
Add an Audio File to a Question
- In the "Question Text" box, select the insert stuff icon (A).

- Select My Computer.
- Select Choose File to choose the audio file.
Note: If choosing a .m4a audio file, the audio with autoplay when the question is opened. To avoid possible issues with multiple audio files playing at once, the file can be converted to .mp3.
- Select Open to add the file.
- Select Upload.
- Complete the question setup based on the question type chosen.
- Select Save.
- After all the questions have been added or created, select the Done Editing Questions button.


